Continuous Data Protection with SyncBackPro & SE
Author: Swapna Naraharisetty, 2BrightSparks Pte. Ltd.
Continuous Data Protection, or Real-Time backup (or continuous data backup), is the process of automatically capturing file changes on a source drive (file creation, modification or deletion) and replicating the changes to a backup drive. With a Continuous Data Protection strategy, you can ensure that every version of a file is backed-up and can be restored at any point in time.
SyncBackPro, and SyncBackSE, provide a reliable and efficient solution to back up your documents, pictures, music, videos and other important files in real-time. Note that this feature is not available in SyncBackFree. For ease of reading, we'll refer to SyncBackPro and SyncBackSE simply as SyncBack.
In this article we will explain how Continuous Data Protection works and how to implement it using SyncBack.
How Does Continuous Data Protection Work?
SyncBack will watch for changes to files and update the backup files automatically when any changes are made. It leverages a Windows feature to detect file changes on Windows devices, e.g. Windows PCs, under Windows direct control (e.g. external drives), network drives and NAS drives that are running Windows.
In addition, you can use SyncBack to backup file changes automatically to an onsite location for rapid recovery (e.g. local drive, external drive, NAS drive, etc.) or offsite location (FTP or the cloud) for disaster recovery purpose.
Steps to Implement Continuous Data Protection With SyncBack
Step 1: Run SyncBack and click on the New button to create a new backup profile:

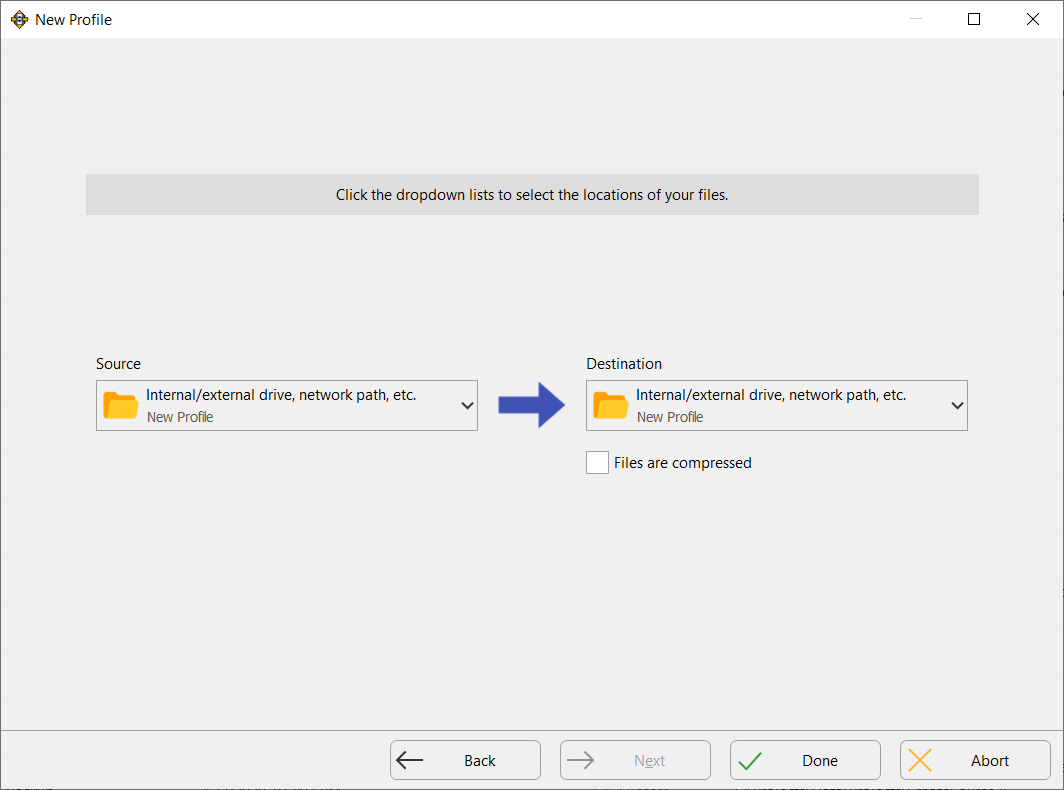
Step 2: On the 3rd screen of the profile creation wizard, you can select the profile’s Source (where to backup from) and Destination (where to backup to). Clicking the drop-down menu on either side will show the various locations SyncBack can backup to (or from). However, for the purpose of this demonstration, we will leave both Source and Destination as the default. Click the Done button to continue:

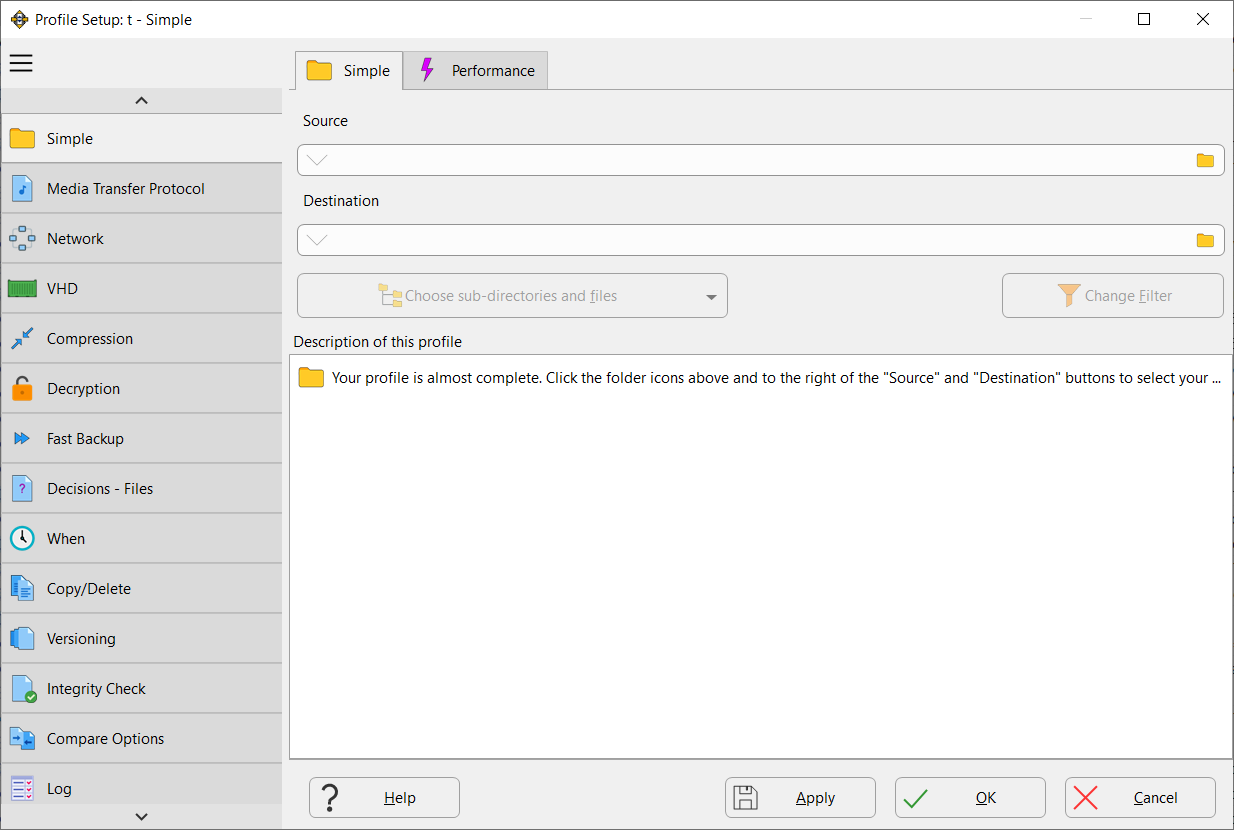
Step 3: On the Profile Setup window, you need to define the profile’s Source and Destination paths by clicking on the folder icons next to source and destination paths:

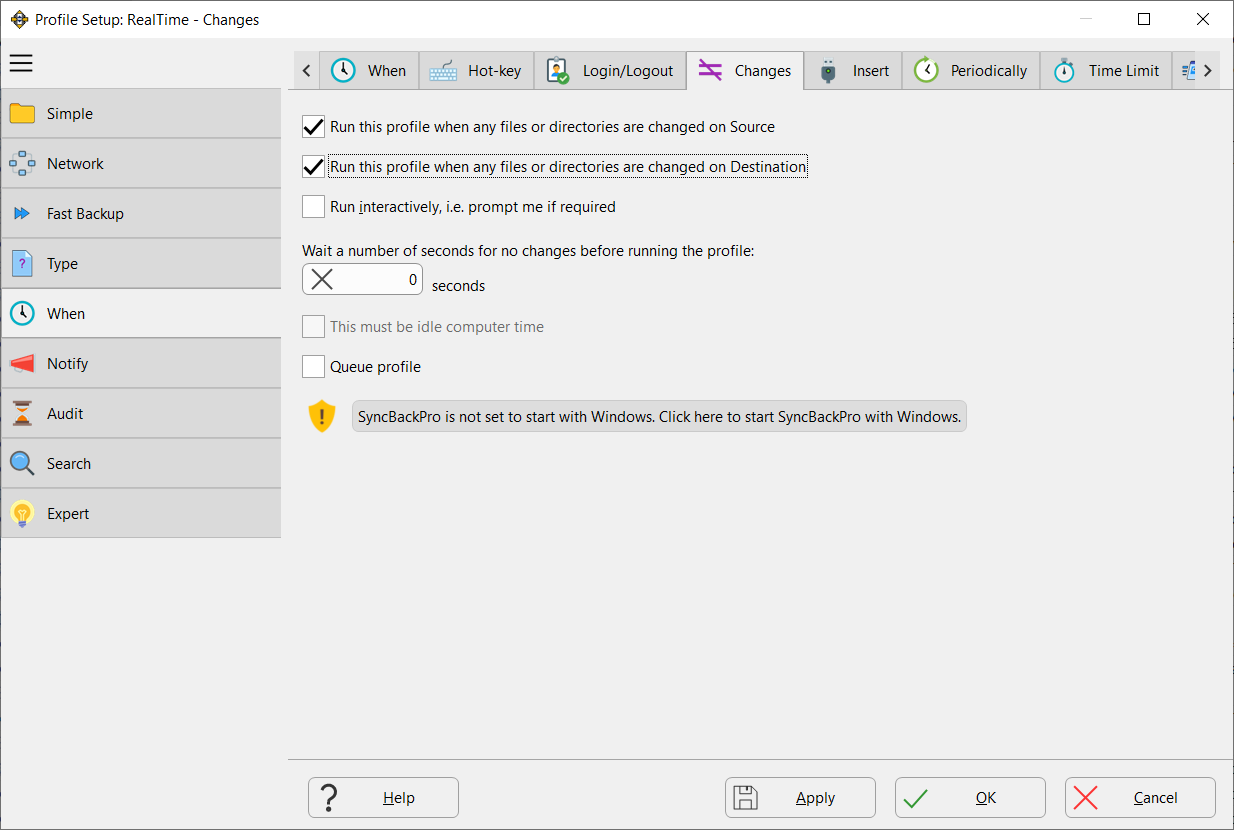
Step 4: Navigate to the When -> Changes settings page and enable the option “Run this profile when any files or directories are changed on Source” and/or “Run this profile when any files or directories are changed on Destination” to detect changes on source/destination:

NOTE: SyncBack cannot detect file changes on NAS drives or network drives that are not running Windows, SAMBA shares, FTP servers, email servers, cloud services, devices connected via MTP or devices running SyncBack Touch. So, if you select any of these resources as your profile’s source/destination location then the file detection on that side will be disabled.
Step 5: By default, the profile is run unattended (i.e. dialog box and prompts related to the profile will not be displayed). If you want SyncBack to prompt you as and when required, then tick the option “Run interactively, i.e. prompt me if required”.
Step 6: A common problem with running a Real-Time profile is that there is no way for SyncBack to know when a program/user has finished writing to or updating a file. For example, a video editing program may take several seconds to save the changes you have made to a video. In that case SyncBack will run once it sees the video file being updated, but the video editing program may not have finished saving the file before SyncBack starts copying that file.
To avoid these kinds of problems you can configure the option “Wait a number of seconds for no changes before running the profile” to wait for a certain number of seconds for no file changes before running the profile. For example, a program may need to update many files before it exits. Updating all those files may take several seconds. Let's say you set this profile setting to 5 seconds. If the program updates one file, then SyncBack will see the change but won't yet run the profile. The program may then update another file a couple of seconds later. SyncBack will detect the change but still won't run the profile because changes were made less than 5 seconds after the previous change. Once the program has saved all its files, and 5 seconds have passed without any file changes, SyncBack will then run the profile.
Step 7: Tick the option “This must be idle computer time” if you want to define the wait time configured in the setting “Wait a number of seconds for no changes before running the profile” as the computer idle time.
For example, if you've specified the profile to wait 5 seconds, and enabled the option “This must be idle computer time”, then SyncBack will wait until the computer has been idle for that number of seconds after any changes are detected. Idle time is the amount of time that the keyboard, mouse and any other input device has not been used. This setting is useful to make sure profiles are not run while you are using the computer.
Step 8: If you have any resource constraints, e.g. low memory or low bandwidth, you can tick the option “Queue Profile” to stop the profile from running immediately and add it to the program queue.
Step 9: Save the profile. It will now run automatically when any changes are detected on the source and/or destination.
Important Things to Note
- SyncBack must be running for it to be able to detect changes. Because of this, you may want to configure SyncBack to start automatically whenever you log-in to Windows. To start SyncBack with Windows, click the burger menu (
 3 horizontal lines on the top-left of SyncBack main window) then select Global Settings. Tick the option "Start with Windows".
 - SyncBack cannot detect changes to files while SyncBack is not running or the user is logged-off. You may want to schedule the profile to run periodically when the user is not logged-on.
- SyncBack runs the profile automatically even when a temporary file is created on source/destination. Every time a profile runs, SyncBack first scans the source and destination locations and then copies the changed files to destination (or vice-versa). Because of this, you may want to add Filters to ignore temporary files if their name-syntax is fixed or predictable. However, you cannot prevent such events triggering a profile scan.
Conclusion
With SyncBackPro/SE, it's easy to create a Continuous Data Protection solution without interrupting your work. When a file is changed on the primary location, SyncBack detects it and synchronize the change automatically to the secondary location, allowing users to perform quick recovery of data when the data is corrupted or lost.
Noted Customers
© 2003-2025 2BrightSparks Pte. Ltd. | Home | Support | Privacy | Terms | Affiliate Program


