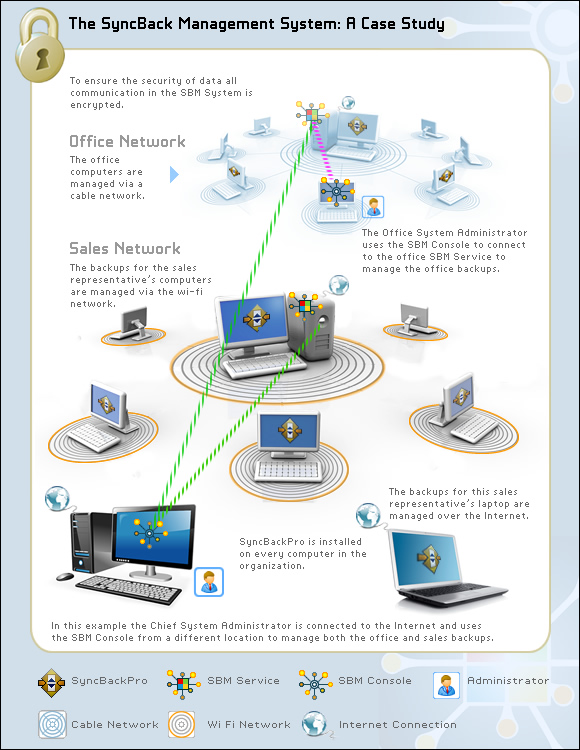
Remote installations of SyncBackPro (![]() Pro version only) can now be managed and monitored from a central location. A server, the SyncBack Management Service (SBM Service), must be installed on a Windows server. You can then configure your installations of SyncBackPro to communicate with your SBM Service so that they can report on when profiles are run and also update their profiles. The communication between SyncBackPro and the SBM Service is done over the network and is encrypted. This means an installation of SyncBackPro can communicate with your SBM Service over an intranet or the Internet.
Pro version only) can now be managed and monitored from a central location. A server, the SyncBack Management Service (SBM Service), must be installed on a Windows server. You can then configure your installations of SyncBackPro to communicate with your SBM Service so that they can report on when profiles are run and also update their profiles. The communication between SyncBackPro and the SBM Service is done over the network and is encrypted. This means an installation of SyncBackPro can communicate with your SBM Service over an intranet or the Internet.
Configuration and management of the SBM Service is done via the SyncBack Management Console (SBM Console). The console can be used from any computer as it communicates with the SBM Service in the same way as SyncBackPro, i.e. over a network connection. The console allows you to view the profile run history of remote SyncBackPro installations, for example. For detailed information on how to use the console please refer to the console help file. The SBM Console is free software which can be downloaded from the 2BrightSparks web site.
|
SBMS is free when used with the current version of SyncBackPro. To use it for free with SyncBackPro you must enter a SyncBackPro V10 or newer serial number into SBMS Server via the SBMS Console. |

Management Service Settings
To set the connection details for SyncBackPro to connect to the SBM Service select Management Service Settings from the burger menu ![]()
•Hostname: This is the hostname of the SBM Service that you want to connect to. Simply enter the hostname or IP address, e.g. myserver.com.
•Port: The default port number is 8100
•Username: The login username for the SBM Service. You must have a username to login to the SBM Service.
•Password: The login password for the SBM Service.
To test the settings click the Test Server button. SyncBackPro will then attempt to connect and login to the SBM Service.
Once these settings have been set (and validated) you may not have the access rights to change them. If not then the settings will be read-only and the Modify button will be visible. To change them you must click the Modify button and then you will be asked for the username and password of a user, e.g. an administrator, that has the access rights to change these settings.
Upload Profile to SBM Service
To upload profiles to the SBM Service first select the profile to upload then select Export / Import -> Upload Profile to SBM Service. Optionally right-click on the profile and select Upload Profile to SBM Service from the pop-up menu. You can only upload profiles if you are an administrator (using the admin role). You must enter a description for the profile and then specify if the schedule for the profile should also be exported. After the profile has been uploaded a message will be displayed giving the unique GUID for the profile. This is for information purposes only so that when you edit the profiles details using the SBM Console you can check to make sure that the profile is the same one you uploaded. Every profile has a universally unique GUID.
If you are using profile groups, it is best to upload the profiles first, and then finally upload the profile groups.
If the menu item Upload Profile to SBM Service is not enabled then you are either not logged into SBMS or your user account in SBMS is not using the admin role.
Important: Once a profile has been uploaded you must use the SBM Console to assign the profile to one or more user groups. If you are updating an existing profile then the profile will still be in the same user groups as it was before the update.
Managed Profiles
Every hour a check is made to see if there are any new or updated managed profiles. It also checks to see if any managed profiles should be deleted. If so they are downloaded from the SBM Service and installed, or deleted as necessary. This is only done when online. You can do an immediate check by pressing Ctrl-F5.
Offline
If SyncBackPro cannot connect to the SBM Service, e.g. there is no network connection, then it will proceed in offline mode. The window caption for SyncBackPro will show if it is in offline mode. When in offline mode it will use the cached security settings (retrieved during the last online login) so that the user will still be restricted in what they can or cannot do. Any profile history created while in offline mode will be automatically and silently uploaded once SyncBackPro can connect to the SBM Service and it has been an hour or more since it last uploaded cached history. You can do an immediate upload by pressing Ctrl-F5.
Group Policies
An alternative to using SBMS is to use Windows Group Policies.
All Content: 2BrightSparks Pte Ltd © 2003-2025
