To run the Profile select the profile in the main program window, then click the Run button:

|
When a profile is running (or paused) it will have two icons shown to the left of it:
Click the
Click the |
A pop-out window on the right will appear as the files are being processed:

As the profile is being processed an icon will also appear on the Windows System Tray (Taskbar corner) located on the bottom right of your screen.
SyncBackPro icon when a profile is not running:

Animated SyncBackPro icon when a profile is running:

However, for it to appear in the Notification Area (also known as the System Tray and Taskbar corner), next to the clock, you may need to drag the icon to the position you want it to be. Alternatively:
•On Windows 11 right-click on the taskbar and selecting Taskbar Settings. This takes you straight to the Settings > Personalization > Taskbar screen. Expand the Taskbar corner overflow section and scroll down until you see the entry for SyncBackPro and then change the switch setting to On.
•On Windows 10 right-click on the taskbar and selecting Taskbar Settings. This takes you straight to the Settings > Personalization > Taskbar screen. Scroll down to the Notification Area section and click the "Select which icons appear on the taskbar" link. Use the list here to customize which icons appear on the taskbar. Icons set to On will appear on the taskbar, while icons set to Off will be hidden behind the up arrow.
•On older versions of Windows you may need to press the Customize... link and configure Windows to Show icons and notifications for SyncBack:

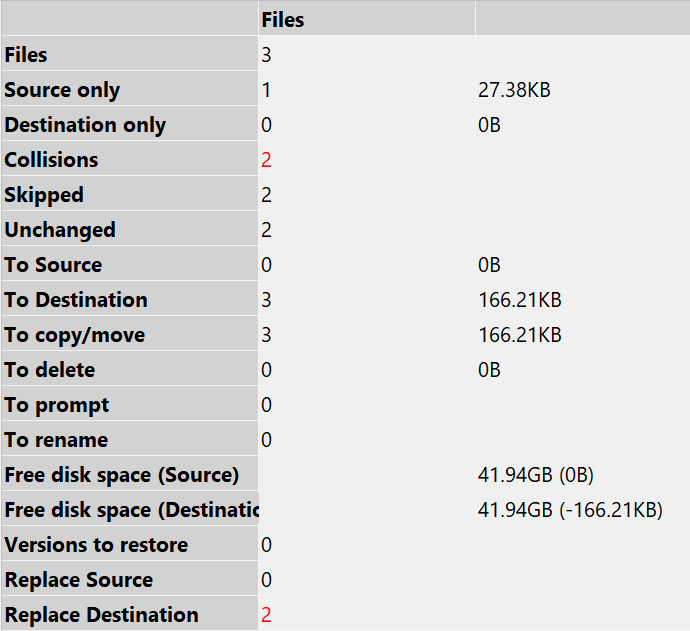
Depending on your settings, the Differences Window may appear after the initial scan takes place. The Differences Window shows what will happen to the files (whether they will be copied, deleted, or moved). Once you have reviewed the differences, click Continue Run:

|
In this example the Differences Window shows 2 collisions. A "collision" is when a file in the source and destination differ but have the same name. In other words, the file is in both the source and destination but is modified in some way, perhaps by date, size etc.
A notification of collisions occur in the "Differences" window which appears by default when making a backup (note however there are circumstances when the "Differences" window does not appear, for example when the user has chosen not to show the window).
Collisions are shown in red in the "Differences" window to highlight there are going to be changes made when you continue the profile task. If the user views the Differences window carefully, the user has the option to make choices about whether they want to accept the changes SyncBackPro will make. The user has the option to bypass these choices by selecting a specific item in the Differences window with a right click. A different action may then be chosen. |
After the profile has been processed the main window will look slightly different as the temporary "stop" and "pause" icons are no longer viewable.
You have now successfully created a simple backup profile. To create a Group Profile you'll need to create two profiles or more. You'll then have the opportunity of running these profiles as one. To find out more about this feature go to Creating a Group Profile.
All Content: 2BrightSparks Pte Ltd © 2003-2025

